สำหรับการกำหนดค่าให้กับตัวแปรของคลาส Intent ก็ยังเหมือนเดิม
Intent intent = new Intent(Intent.ACTION_SEND);แต่การกำหนดประเภทของข้อมูลจะกำหนดให้เป็น Email แทน
intent.setType("text/email");ในการแชร์ข้อความสำหรับ Email ก็จะมีเพิ่มขึ้นมาสองอันคือ ชื่อ Address ของคนที่จะส่งให้ และหัวเรื่องของเมลล์นั้นๆ สำหรับการกำหนดชื่อ Address ที่จะส่งจะใช้คำสั่งดังนี้
intent.putExtra(Intent.EXTRA_EMAIL, String[])จะเห็นว่าในคำสั่งนี้จะกำหนดเป็น String Array แทน เพราะสามารถรองรับการใส่ Address ทีละหลายๆคนได้
intent.putExtra(Intent.EXTRA_SUBJECT, "ชื่อหัวเรื่อง");ดังนั้นสรุปคำสั่งที่ใช้สำหรับแชร์ข้อความสำหรับ Email จะได้ดังนี้
Intent intent = new Intent(Intent.ACTION_SEND);
intent.setType("text/email");
intent.putExtra(Intent.EXTRA_EMAIL, new String[]{"ผู้รับ", "ผู้รับ", ... });
intent.putExtra(Intent.EXTRA_SUBJECT, "ชื่อหัวเรื่องของเมลล์");
intent.putExtra(Intent.EXTRA_TEXT, "ข้อความในเมลล์");
startActivity(Intent.createChooser(intent, "ชื่อหัวข้อ"));
สังเกตุที่คำสั่งกำหนดชื่อผู้รับเมลล์เป็นหลัก ว่าป็น String Array ทำให้สามารถส่งทีเดียวไปยังผู้รับหลายๆคนได้นั่นเอง
main.xml
<LinearLayout xmlns:android="http://schemas.android.com/apk/res/android"
    xmlns:tools="http://schemas.android.com/tools"
    android:layout_width="match_parent"
    android:layout_height="match_parent"
    android:focusableInTouchMode="true"
    android:focusable="true"
    android:orientation="vertical"
    android:gravity="center" >

    <requestFocus />

    <EditText
        android:id="@+id/editTextAddress"
        android:layout_width="wrap_content"
        android:layout_height="wrap_content"
        android:ems="12"
        android:hint="Email Address"
        android:inputType="textEmailAddress"
        android:singleLine="true" />

    <EditText
        android:id="@+id/editTextSubject"
        android:layout_width="wrap_content"
        android:layout_height="wrap_content"
        android:ems="12"
        android:hint="Subject"
        android:singleLine="true" />

    <EditText
        android:id="@+id/editTextMessage"
        android:layout_width="wrap_content"
        android:layout_height="wrap_content"
        android:ems="12"
        android:hint="Message"
        android:lines="6" />

    <Button
        android:id="@+id/buttonIntent"
        android:layout_width="wrap_content"
        android:layout_height="wrap_content"
        android:text="Send" />

</LinearLayout>
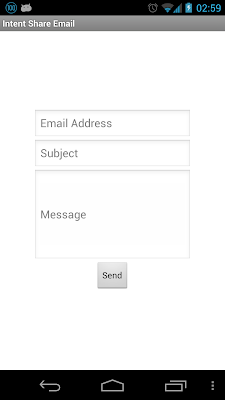
สำหรับ Layout ก็จะมี Edit Text สามตัว และ Button หนึ่งตัว โดยที่ Edit Text ทั้งสามสำหรับใส่ข้อมูลแต่ละอันนั่นเอง
Main.java
package app.akexorcist.intentshareemail;

import android.os.Bundle;
import android.app.Activity;
import android.content.Intent;
import android.view.View;
import android.view.View.OnClickListener;
import android.widget.Button;
import android.widget.EditText;

public class Main extends Activity {
    EditText editTextAddress, editTextSubject, editTextMessage;
    Button buttonIntent;

    protected void onCreate(Bundle savedInstanceState) {
        super.onCreate(savedInstanceState);
        setContentView(R.layout.main);

        editTextAddress = (EditText)findViewById(R.id.editTextAddress);
        editTextSubject = (EditText)findViewById(R.id.editTextSubject);
        editTextMessage = (EditText)findViewById(R.id.editTextMessage);

        Button buttonIntent = (Button)findViewById(R.id.buttonIntent);
        buttonIntent.setOnClickListener(new OnClickListener() {
            public void onClick(View v) {
                Intent intent = new Intent(Intent.ACTION_SEND);
                intent.setType("text/email");
                intent.putExtra(Intent.EXTRA_EMAIL
                        , new String[] {editTextAddress.getText().toString()});
                intent.putExtra(Intent.EXTRA_SUBJECT
                        , editTextSubject.getText().toString());
                intent.putExtra(Intent.EXTRA_TEXT
                        , editTextMessage.getText().toString());
                startActivity(Intent.createChooser(intent, "Send email with"));
            }
        });
    }
}
AndroidManifest.xml
<?xml version="1.0" encoding="utf-8"?>
<manifest xmlns:android="http://schemas.android.com/apk/res/android"
    package="app.akexorcist.intentshareemail"
    android:versionCode="1"
    android:versionName="1.0" >

    <uses-sdk
        android:minSdkVersion="8"
        android:targetSdkVersion="8" />

    <application
        android:allowBackup="true"
        android:icon="@drawable/ic_launcher"
        android:label="@string/app_name"
        android:theme="@style/AppTheme" >
        <activity
            android:name="app.akexorcist.intentshareemail.Main"
            android:label="@string/app_name"
            android:screenOrientation="portrait">
            <intent-filter>
                <action android:name="android.intent.action.MAIN" />

                <category android:name="android.intent.category.LAUNCHER" />
            </intent-filter>
        </activity>
    </application>

</manifest>
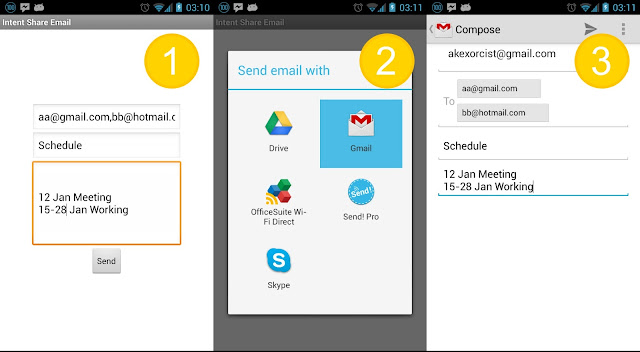
ในการทดสอบการทำงาน เมื่อใส่เมลล์ของผู้รับหลายๆคน ก็ให้คั่นด้วยเครื่องหมายลูกน้ำ ก็จะส่งพร้อมๆกันหลายคนได้ โดยตัวอย่างจะให้ส่งข้อมูลทั้งหมดไปที่แอพ Gmail
สำหรับผู้ที่หลงเข้ามาอ่านคนใดต้องการไฟล์ตัวอย่างสามารถดาวน์โหลดได้จาก Intent - Share Email [Google Drive]
บทความที่เกี่ยวข้อง
การใช้ Intent สำหรับแชร์ข้อความ String [Send]
การใช้ Intent เพื่อเปิด URL [View]
การใช้ Intent เพื่อเปิดแผนที่ [View]
การใช้ Intent เพื่อเปิดไฟล์ใดๆ [View]
การเรียกเปิดแอพฯอื่นๆ ด้วย Intent
การใช้ Intent สำหรับแชร์ไฟล์ใดๆ [Send]
การเลือกไฟล์ภาพจาก Gallery ด้วย Intent [Result]
การใช้งานกล้องเพื่อถ่ายภาพแบบง่ายๆด้วย Intent [Result]
การใช้งานกล้องเพื่อบันทึกวีดีโอแบบง่ายๆด้วย Intent [Result]
การอ่าน QR Code และ Barcode ด้วย Intent [Result]
การรับข้อมูล Intent จากแอพฯอื่นๆ [Get Content]
การรับข้อมูล Intent จากแอพฯอื่นแล้วส่งข้อมูลกลับไป [Result Content]


