

สำหรับบทความนี้เจ้าของบล็อกคงอธิบายยาก เพราะกลัวว่าผู้ที่หลงเข้ามาอ่านจะไม่เข้าใจซะมากกว่า จากบทความก่อนหน้านี้จะเป็นการรับ Content จากแอพฯอื่น คราวนี้จะเป็นการรับ Intent มาอย่างเดียว คือไม่มีข้อมูลส่งมา แต่ว่าจะให้ผู้ใช้เลือกข้อมูลที่จะส่งกลับไปที่แอพฯนั้นๆแทน
ถ้ายังไม่เข้าใจ ให้นึกภาพว่าใช้แอพตัวหนึ่งเช่นแต่งภาพ ทีนี้แอพฯพวกนี้ก็จะมีให้เลือกว่าเลือกไฟล์ภาพจาก Gallery แอพฯก็จะ Intent ไปที่ Gallery เพื่อเลือกภาพจาก Gallery เมื่อเลือกภาพได้แล้ว Gallery ก็จะส่งไฟล์ภาพกลับมานั่นเอง และคราวนี้แหละ จะเลียนแบบความสามารถที่ว่าของ Gallery
เมื่อมีแอพฯใดๆต้องการเลือกไฟล์ภาพจากแอพอื่น ก็จะมีแอพฯของตัวอย่างนี้แสดงขึ้นมาในลิสให้เลือกด้วย พอเลือก Intent มาที่แอพนี้ ก็จะแสดงภาพให้เลือก เมื่อเลือกภาพใดก็จะส่งภาพนั้นกลับไปให้แอพฯที่ Intent มา (จริงๆแล้วไม่ได้ส่งข้อมูลภาพโดยตรง ภาพจะอยู่ในเครื่อง แล้วส่งเป็นคลาส Uri มาแทน เหมือนตัวอย่างที่ผ่านมา)

สำหรับแอพฯคราวนี้ก็เหมือนกับของเดิมที่เคยพูดก่อนหน้าว่าหน้าแรกจะไม่มีการใส่คำสั่งอะไร ต้องเป็นการ Intent เท่านั้นถึงจะสามารถเข้าสู่หน้าเลือกภาพที่ต้องการได้
[Android Code] การรับข้อมูล Intent จากแอพฯอื่นแล้วส่งข้อมูลกลับไป [Result Content]
ดังนั้นไฟล์ Main.java กับ main.xml จะไม่อธิบาย เพราะไม่มีอะไร

คราวนี้ก็จะเปลี่ยนมาตั้งชื่อไฟล์เป็น Gallery Selector ละกัน ซึ่งจริงๆไม่ได้ดึงไฟล์ภาพทั้งหมดในเครื่องโดยตรงหรอก เจ้าของบล็อกใช้วิธีเก็บไฟล์ไว้ใน assets แล้วก๊อปไฟล์ลงเครื่องเพื่อสมมติตัวอย่างการใช้งานเฉยๆ ขอให้เข้าใจ ณ ที่นี้ด้วย เพราะเดี๋ยวผู้ที่หลงเข้ามาอ่านหลายคนเข้าใจกันผิดๆว่าการจะทำแบบนี้ได้ต้องเก็บไฟล์ไว้ใน assets ก่อน
ซึ่งจริงๆแล้ว แอพส่วนใหญ่ที่รับ Intent แบบนี้ได้ จะใช้วิธีสแกนไฟล์ภาพในเครื่องมาแสดงนั่นแหละ แต่เจ้าของบล็อกขี้เกียจทำ เดี๋ยวโค๊ดเยอะชวนสับสน
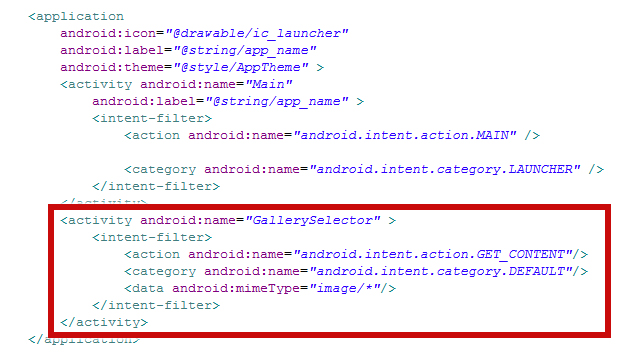
โดยกำหนดให้ GallerySelector รองรับ Intent ที่มี Action เป็น GET_CONTENT และกำหนด Category ให้เป็น DEFAULT และข้อมูลที่รองรับเป็นไฟล์ภาพใดๆ
Intent intent = new Intent("app.akexorcist.intentresultcontent.RESULT_ACTION");
intent.setData(Uri.fromFile(file));
setResult(RESULT_OK, intent);
finish();
ให้สังเกตที่ตอนประกาศคลาส Intent จะกำหนดชื่อแพคเกจของแอพด้วย แล้วตามด้วย RESULT_ACTION เพื่อกำหนด Action เป็น RESULT_ACTION แล้วกำหนดข้อมูลที่จะส่งกลับเป็นคลาส Uri ซึ่งเรียกจากคลาส File อีกที จากนั้นกำหนดให้เป็น RESULT_OK พร้อมกับ Intent กลับ ตามด้วย finish() เพื่อปิด Activity ของ GallerySelector ทิ้ง ไม่งั้นเดี๋ยวกด Back ย้อนกลับมาได้
File file = new File(Environment.getExternalStorageDirectory()
        , "File Directory");
สำหรับ "File Directory" ก็คือให้กำหนดที่อยู่ของไฟล์นั่นเอง
สมมติว่าไฟล์อยู่ใน /DCIM/Photo/image_001.jpg ก็จะกำหนดดังนี้
File file = new File(Environment.getExternalStorageDirectory()
        , "/DCIM/Photo/image_001.jpg");
พอนำไปใช้ในคำสั่ง Intent แบบ Result Action ก็จะเป็นดังนี้
File file = new File(Environment.getExternalStorageDirectory()
        , "/DCIM/Photo/image_001.jpg");
Intent intent = new Intent("app.akexorcist.intentresultcontent.RESULT_ACTION");
intent.setData(Uri.fromFile(file));
setResult(RESULT_OK, intent);
finish();
คำสั่งข้างบนนี้ก็จะเป็นการส่งข้อมูลของไฟล์ตามที่อยู่ดังกล่าวกลับไปให้แอพที่ได้ Intent แบบ Get Content มายังแอพฯตัวนี้ และอย่าลืมว่าไม่ได้ส่งข้อมูลของภาพจริงๆ แต่ส่ง Uri แทน
สำหรับกรณีที่จะส่งข้อมูลอย่างเช่น String กลับไปแทน (อย่าลืมกำหนดใน AndroidManifest.xml เป็น text/plain ด้วยล่ะ)
String resultVariable = "Message From Result Content";
Intent intent =
        new Intent("app.akexorcist.intentresultcontent.RESULT_ACTION");
intent.putExtra("Key", resultVariable);
setResult(RESULT_OK, intent);
finish();
ถ้ายังจำกันได้ ก็คือ putExtra เก็บค่าตัวแปรเพื่อส่งกลับไปนั่นเอง
สรุปแล้วเจ้าของบล็อกขอทวนให้ผู้ที่หลงเข้ามาอ่านอีกรอบละกันนะ
• ถ้าส่งข้อมูลที่เป็นไฟล์ใดๆ ให้เก็บไฟล์ใน External Storage หรือ SD
• แล้วจึงกำหนดที่อยู่ของไฟล์ในคลาส File แล้วไปกำหนดใน Uri อีกที
• และถ้าส่งข้อมูลที่เป็นตัวแปรใดๆ ก็ให้ใช้คำสั่ง putExtra แทน
ทีนี้มาดูคำสั่งทั้งหมดของตัวอย่างนี้กันเลยดีกว่าเนอะ
(ไม่แปะ Main.java กับ main.xml นะ อย่างที่บอก ไม่มีอะไร)
GallerySelector.java
สำหรับคำสั่งก็ไม่ขออธิบายอะไรมาก เพราะพูดไปหมดแล้ว ให้ผู้ที่หลงเข้ามาอ่านโฟกัสแค่คำสั่งหลักๆเท่านั้นละกันนะ เพราะมีบางคำสั่งที่ไม่เกี่ยวข้องกันอยู่ด้วย (ตัวหนังสือสีแดง)
gallery.xml

AndroidManifest.xml
สำหรับผู้ที่หลงเข้ามาอ่านคนใดต้องการไฟล์ตัวอย่างสามารถดาวน์โหลดได้จาก Result Content [Google Drive]
จะเข้าใจมั้ยหว่า??
บทความที่เกี่ยวข้อง
การใช้ Intent สำหรับแชร์ข้อความ String [Send]
การใช้ Intent สำหรับแชร์ข้อความสำหรับ Email [Send]
การใช้ Intent เพื่อเปิด URL [View]
การใช้ Intent เพื่อเปิดแผนที่ [View]
การใช้ Intent เพื่อเปิดไฟล์ใดๆ [View]
การเรียกเปิดแอพฯอื่นๆ ด้วย Intent
การใช้ Intent สำหรับแชร์ไฟล์ใดๆ [Send]
การเลือกไฟล์ภาพจาก Gallery ด้วย Intent [Result]
การใช้งานกล้องเพื่อถ่ายภาพแบบง่ายๆด้วย Intent [Result]
การใช้งานกล้องเพื่อบันทึกวีดีโอแบบง่ายๆด้วย Intent [Result]
การอ่าน QR Code และ Barcode ด้วย Intent [Result]
การรับข้อมูล Intent จากแอพฯอื่นๆ [Get Content]
การรับข้อมูล Intent จากแอพฯอื่นแล้วส่งข้อมูลกลับไป [Result Content]
• แล้วจึงกำหนดที่อยู่ของไฟล์ในคลาส File แล้วไปกำหนดใน Uri อีกที
• และถ้าส่งข้อมูลที่เป็นตัวแปรใดๆ ก็ให้ใช้คำสั่ง putExtra แทน
ทีนี้มาดูคำสั่งทั้งหมดของตัวอย่างนี้กันเลยดีกว่าเนอะ
(ไม่แปะ Main.java กับ main.xml นะ อย่างที่บอก ไม่มีอะไร)
GallerySelector.java
package app.akexorcist.intentresultcontent;

import java.io.File;
import java.io.FileOutputStream;
import java.io.IOException;
import java.io.InputStream;
import java.io.OutputStream;

import android.app.Activity;
import android.content.Intent;
import android.net.Uri;
import android.os.Bundle;
import android.os.Environment;
import android.view.View;
import android.view.View.OnClickListener;
import android.widget.ImageView;

public class GallerySelector extends Activity implements OnClickListener {
    public void onCreate(Bundle savedInstanceState) {
        super.onCreate(savedInstanceState);
        setContentView(R.layout.gallery);

        ImageView imageView1 = (ImageView)findViewById(R.id.imageView1);
        imageView1.setOnClickListener(this);
        ImageView imageView2 = (ImageView)findViewById(R.id.imageView2);
        imageView2.setOnClickListener(this);
        ImageView imageView3 = (ImageView)findViewById(R.id.imageView3);
        imageView3.setOnClickListener(this);

    }

    public void onClick(View arg0) {
        String fileName = null;
        if(arg0.getId() == R.id.imageView1) {
            fileName = "wallpaper_01.jpg";
        } else if(arg0.getId() == R.id.imageView2) {
            fileName = "wallpaper_02.jpg";
        } else if(arg0.getId() == R.id.imageView3) {
            fileName = "wallpaper_03.jpg";
        }

        /**** For uri result ****/
        File file = assetToFile(fileName);

        /**** Actual command for uri result ****/
        //File file = new File(Environment.getExternalStorageDirectory()
        //        , "File Directory");


        Intent intent =
                new Intent("app.akexorcist.intentresultcontent.RESULT_ACTION");
        intent.setData(Uri.fromFile(file));
        setResult(RESULT_OK, intent);
        finish();

        /**** For variable result ****/
        /*
        Intent intent =
                new Intent("app.akexorcist.intentresultcontent.RESULT_ACTION");
        intent.putExtra("Key", resultVariable);
        setResult(RESULT_OK, intent);
        finish();
         */
    }

    public File assetToFile(String filePath) {
        new File(Environment.getExternalStorageDirectory().getAbsolutePath()
                , "tmp").mkdir();
        String fileName = filePath.substring(filePath.lastIndexOf("/") + 1);
        File file =
                new File(Environment.getExternalStorageDirectory()
                , "tmp/" + fileName);
        if(!file.exists()) {
            try {
                InputStream is = getResources().getAssets().open(filePath);
                OutputStream out = new FileOutputStream(file);
                byte[] buffer = new byte[is.available()];
                is.read(buffer);
                out.write(buffer, 0, buffer.length);
                is.close();
                out.close();
            } catch (IOException e) {
                e.printStackTrace();
            }
        }
        return file;
    }
}
สำหรับคำสั่งก็ไม่ขออธิบายอะไรมาก เพราะพูดไปหมดแล้ว ให้ผู้ที่หลงเข้ามาอ่านโฟกัสแค่คำสั่งหลักๆเท่านั้นละกันนะ เพราะมีบางคำสั่งที่ไม่เกี่ยวข้องกันอยู่ด้วย (ตัวหนังสือสีแดง)
gallery.xml
<LinearLayout xmlns:android="http://schemas.android.com/apk/res/android"
    xmlns:tools="http://schemas.android.com/tools"
    android:id="@+id/LinearLayout1"
    android:layout_width="match_parent"
    android:layout_height="match_parent"
    android:gravity="center"
    android:orientation="vertical" >

    <ScrollView
        android:layout_width="match_parent"
        android:layout_height="wrap_content"
        android:scrollbars="none" >

        <LinearLayout
            android:layout_width="match_parent"
            android:layout_height="match_parent"
            android:orientation="vertical"
            android:layout_margin="30dp" >

              <ImageView
                  android:id="@+id/imageView1"
                  android:layout_width="match_parent"
                  android:layout_height="wrap_content"
                  android:padding="5dp"
                  android:scaleType="centerCrop"
                  android:src="@drawable/wallpaper_01" />

            <ImageView
                android:id="@+id/imageView2"
                android:layout_width="match_parent"
                android:layout_height="wrap_content"
                android:padding="5dp"
                android:scaleType="centerCrop"
                android:src="@drawable/wallpaper_02" />

            <ImageView
                android:id="@+id/imageView3"
                android:layout_width="match_parent"
                android:layout_height="wrap_content"
                android:padding="5dp"
                android:scaleType="centerCrop"
                android:src="@drawable/wallpaper_03" />
        </LinearLayout>
    </ScrollView>
</LinearLayout>
AndroidManifest.xml
<?xml version="1.0" encoding="utf-8"?>
<manifest xmlns:android="http://schemas.android.com/apk/res/android"
    package="app.akexorcist.intentresultcontent"
    android:versionCode="1"
    android:versionName="1.0" >

    <uses-sdk
        android:minSdkVersion="8"
        android:targetSdkVersion="8" />

    <uses-permission android:name="android.permission.WRITE_EXTERNAL_STORAGE" />

    <application
        android:icon="@drawable/ic_launcher"
        android:label="@string/app_name"
        android:theme="@style/AppTheme" >
        <activity android:name="Main"
            android:label="@string/app_name" >
            <intent-filter>
                <action android:name="android.intent.action.MAIN" />

                <category android:name="android.intent.category.LAUNCHER" />
            </intent-filter>
        </activity>
        <activity android:name="GallerySelector" >
            <intent-filter>
                <action android:name="android.intent.action.GET_CONTENT"/>
                <category android:name="android.intent.category.DEFAULT"/>
                <data android:mimeType="image/*"/>
            </intent-filter>
        </activity>
    </application>

</manifest>
สำหรับผู้ที่หลงเข้ามาอ่านคนใดต้องการไฟล์ตัวอย่างสามารถดาวน์โหลดได้จาก Result Content [Google Drive]
จะเข้าใจมั้ยหว่า??
บทความที่เกี่ยวข้อง
การใช้ Intent สำหรับแชร์ข้อความ String [Send]
การใช้ Intent สำหรับแชร์ข้อความสำหรับ Email [Send]
การใช้ Intent เพื่อเปิด URL [View]
การใช้ Intent เพื่อเปิดแผนที่ [View]
การใช้ Intent เพื่อเปิดไฟล์ใดๆ [View]
การเรียกเปิดแอพฯอื่นๆ ด้วย Intent
การใช้ Intent สำหรับแชร์ไฟล์ใดๆ [Send]
การเลือกไฟล์ภาพจาก Gallery ด้วย Intent [Result]
การใช้งานกล้องเพื่อถ่ายภาพแบบง่ายๆด้วย Intent [Result]
การใช้งานกล้องเพื่อบันทึกวีดีโอแบบง่ายๆด้วย Intent [Result]
การอ่าน QR Code และ Barcode ด้วย Intent [Result]
การรับข้อมูล Intent จากแอพฯอื่นๆ [Get Content]
การรับข้อมูล Intent จากแอพฯอื่นแล้วส่งข้อมูลกลับไป [Result Content]